

Set up a webhook
Who this is for: people who want another system (GitHub, Stripe, a web shop or your own app) to start a workflow when something happens.
Before you start: you need the Manage webhooks permission (admins and editors have it). To show the signing secret you need the Reveal secrets permission (admins).
A webhook endpoint is a URL that another system calls. Each call is a delivery. Liitora checks that the delivery is genuine, records it, and starts every active workflow that listens on the endpoint.
Create the endpoint in the app
Section titled “Create the endpoint in the app”- Open Webhooks.
- Select Add an endpoint.
- Fill in Name. Use lowercase letters, numbers and hyphens, for example
devices-changed. Workflows listen on this name, and you cannot change it later. - Add a Description if you like.
- Pick the Sender: Any system, GitHub or Stripe.
- For Any system, pick How requests are checked: Signed (HMAC-SHA256) (recommended), Bearer token or Username and password. GitHub and Stripe always use their own signatures.
- Select Create the endpoint.
- The next screen shows the URL and the steps for the sender. Select Copy the URL. The signing secret is not shown here.
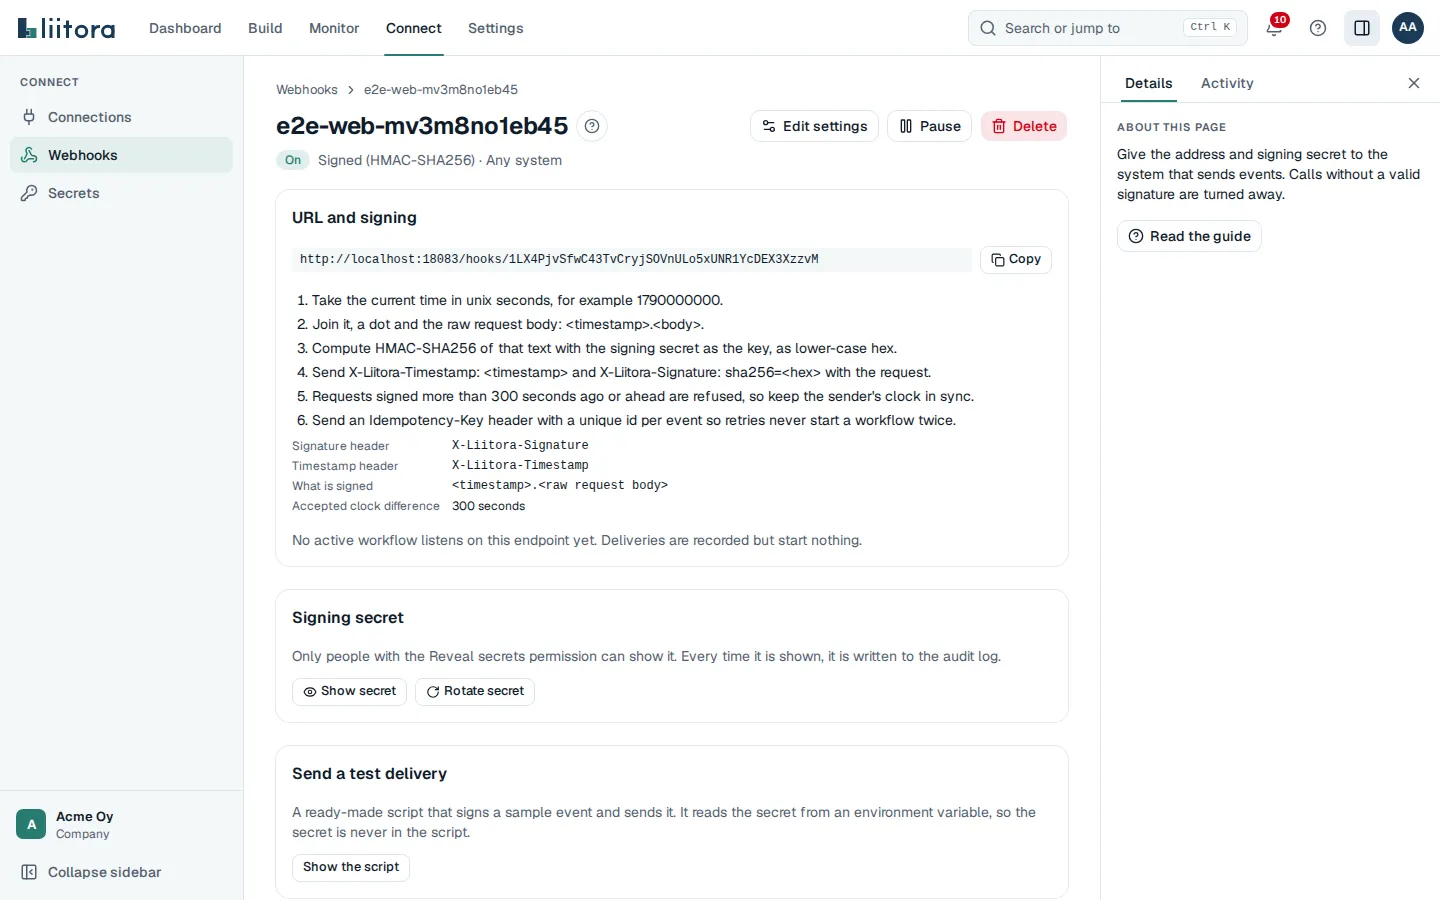
- Select Open the endpoint. On its page, a person with the Reveal secrets permission selects Show secret. The secret is shown for 30 seconds, and this is written to the audit log.
Your plan sets how many endpoints your company can have (see Limits per plan). When all of them are in use, delete one you no longer need before you add another.
Or ask your AI assistant
Section titled “Or ask your AI assistant”Ask, for example: “When our web shop sends a new ticket to a webhook, create it in the service desk.” The assistant uses create_webhook_workflow, which creates the endpoint (or reuses one with that name) and a draft workflow in one go. It can also create only the endpoint with create_webhook_endpoint.
The assistant gets the URL and the signing steps, never the secret. You show the secret yourself on the endpoint’s page.
Connect a workflow
Section titled “Connect a workflow”A workflow listens on an endpoint with on.webhook.endpoint:
on: webhook: { endpoint: devices-changed }The delivery is available to the steps as trigger.body (parsed JSON, a form as an object, or text) and trigger.headers. Senders can use JSON, forms, plain text, CSV (text/csv) or XML. JSON must be strict and nested at most 64 levels deep, or the sender gets 400 invalid_body. To get XML, CSV or form fields as an object in trigger.body, add parse: xml, parse: csv or parse: form to the trigger, see Webhook. Only active workflows are started. Until one is active, the endpoint page says No active workflow listens on this endpoint yet. Deliveries are recorded but start nothing.
A webhook workflow needs a test case for a malformed payload before it can be activated. See Read and write workflow tests.
Set up your own system
Section titled “Set up your own system”- Give the sender the URL.
- Store the signing secret in the sender’s own secret store, not in its code.
- Sign each request as described in Webhook signing, which has samples in bash, Node.js, Python and PowerShell.
- Send an
Idempotency-Keyheader with a unique id per event, so a retried delivery never starts a workflow twice. - Retry on answers 429 and 5xx.
Set up GitHub
Section titled “Set up GitHub”- Create the endpoint with Sender set to GitHub.
- Show the secret on the endpoint’s page and copy it.
- In GitHub, open the repository (or organization) Settings, then Webhooks, then Add webhook.
- Paste the URL into Payload URL.
- Set Content type to
application/json. - Paste the secret into Secret.
- Choose the events you want and select Add webhook.
- GitHub sends a
pingdelivery. It shows up under Recent events on the endpoint page.
Set up Stripe
Section titled “Set up Stripe”Stripe makes the signing secret itself, so the order is different.
- Create the endpoint with Sender set to Stripe.
- Copy the URL. In the Stripe Dashboard, add a webhook endpoint with that URL and choose the events.
- Stripe shows the endpoint’s signing secret (it starts with
whsec_). Copy it. - Back in Liitora, select Paste Stripe’s signing secret on the done screen, or open Secrets and add the value of the endpoint’s secret under Waiting for you. See Add a secret from a link.
- Until the secret is pasted, Liitora refuses every delivery with 401.
Check that it works
Section titled “Check that it works”- On the endpoint’s page, open Send a test delivery and select Show the script.
- Copy the script. Set
LIITORA_WEBHOOK_SECRETto the signing secret in your terminal, then run the script. - The answer is
{"duplicate":false,"event_id":"...","run_ids":[...]}. A new line appears under Recent events, with a link to each run it started. - Open Runs to follow the run.
If the answer is 401, see A webhook returns 401.
Pause or delete an endpoint
Section titled “Pause or delete an endpoint”- Pause on the endpoint’s page refuses all deliveries, as if the URL did not exist. Turn on accepts them again.
- Delete removes the URL at once, with its events and its secret. This can’t be undone. A person must do it.
If Liitora blocks an endpoint
Section titled “If Liitora blocks an endpoint”If an endpoint is used in a way our terms don’t allow, for example to receive spam, we can block it. Its page then says Liitora has blocked this endpoint, with the date and the reason. Every delivery to its URL is refused, like for an unknown URL. Pausing and turning it on again doesn’t lift the block. Contact support to get it lifted.
Settings only in the API
Section titled “Settings only in the API”These settings have no screen yet. Change them with PATCH /api/v1/webhook-endpoints/{id} and an API token that has the Manage webhooks permission:
| Field | Meaning | Default |
|---|---|---|
ip_allowlist |
Sender addresses or ranges allowed, for example ["203.0.113.0/24"]. Empty means any address. At most 100 |
empty |
rate_limit_per_min |
Deliveries per minute for this endpoint, 1 to 100000 | 60 |
payload_max_bytes |
Largest body accepted, 1 to 262144 bytes | 262144 |
replay_window_s |
Accepted clock difference in seconds, 1 to 3600 | 300 |
signature_header |
Name of the signature header for the Liitora scheme | X-Liitora-Signature |
curl -sS -X PATCH "https://<your Liitora API address>/api/v1/webhook-endpoints/<endpoint id>" \ -H "Authorization: Bearer $LIITORA_API_TOKEN" \ -H 'Content-Type: application/json' \ -d '{"ip_allowlist": ["203.0.113.0/24"], "rate_limit_per_min": 120}'A change reaches the webhook receiver within about 10 seconds.